This is a collection of user modifications that you may find useful.
The usual disclaimers apply to all code samples (including the user mods and zaps).
The usual disclaimers apply to all code samples (including the user mods and zaps).
Warning: Always take a copy of the target code before changing it.
Please consult your site System Programmer before modifying anything.
|
|
||
| Saving the volume serial number in the ISPF 3.4 panel | ||
|
In the IBM supplied panel ISRUDLP find the line: (this is at about line 307) VER (&ZDLPVL,NONBLANK) Immediately after this line add:VPUT (ZDLPVL) SHARED |
This usermod will remember the last volume serial number you used (if you did) on the ISPF 3.4 (ISRUDLP) menu. | |
|
|
||
| Saving the ISPPREP input and output datasets | ||
|
In the IBM supplied panel ISPPREPA find the line: (this is at about line 38) &ZWINTTL = 'ISPPREP' Immediately after this line add:VGET (INDSNAM OUTDSNAM) PROFILE Next find the line:(this is about 2 lines up from the bottom) )END Immediately before this line add:VPUT (INDSNAM OUTDSNAM) PROFILE
|
This usermod is a quick and dirty usermod to the ISPPREPA panel
used by the ISPPREP function.
It basically saves the values used for the the input and output datasets into the TSO user's profile dataset. The only issue is that the names that they get saved as are pretty likely to be used on user written panels! We have a solution to this but it requires a Zap to ISPPREP and a new user panel. This solution is available here. The XMI file on the page contains the fixes need for both ISPF 6.0 and ISPF 7.5. |
|
|
|
||
| Eliminating the ISPF Copyright panel at ISPF Startup | ||

|
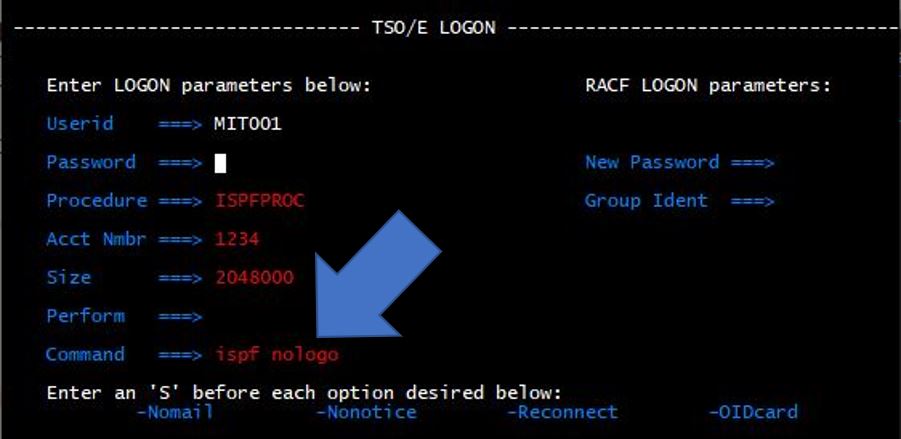
This really isn't a usermod as such, it is more like a handy tip
to get rid of the IBM logo from the ISPF main menu when you first logon to TSO.
The 'fix' applies only to the TSO user being signed on and shouldn't effect anyone else. To implement the change simply type nologo next to the ISPF on the Command line as indicated in the adjacent image. |
|
|
|
||
| Arranging SDSF Columns | ||
>
Steps to rearrange SDSF columns
|
If you don't think that the default
column arrangements in SDSF make much sense, you can change the order by using the SDSF ARRANGE command. We use this to put the job maximum return code on the first panel. The steps to do this are detailed alongside. You can use this technique on any SDSF panel. The changes will remain in effect until you change them again. A video demonstration is avail on YouTube™ here. |
|
|
|
||


